MINI WAR COMMAND ARCHIVEUPDATED: MAY 2026PLAYER STRATEGY NOTES
Mini War Strategy Archetypes - Complete Tactical Plan
In Mini War, picking the wrong strategy at the start means an instant throw. Don't expect a single, rigid build order to carry you through every match—you need to read the lobby and switch your setup on the fly.
Here is the breakdown of the 5 meta strategy archetypes, including counters and transition loops for the latest updates featuring Clans, Antimatter, Nukes, and Riot events.
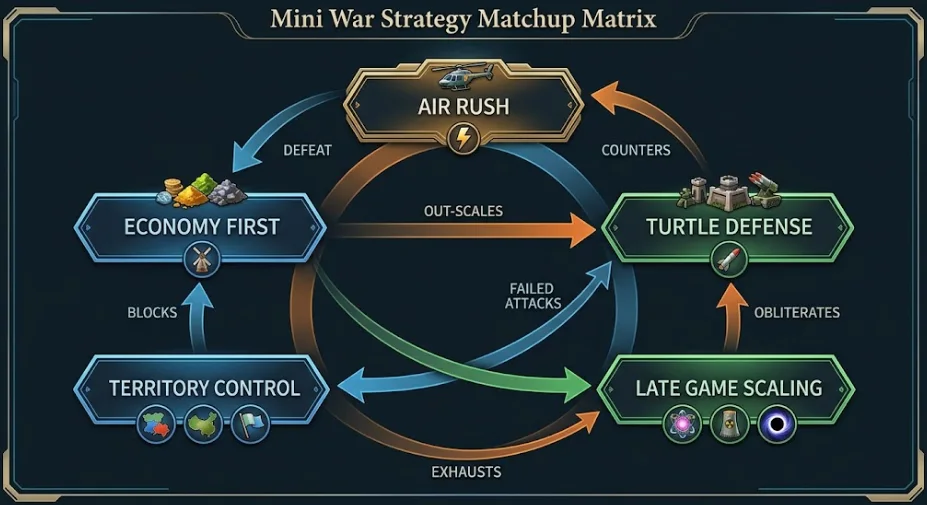
The Lingo: Play like a pure tycoon early on. Don't waste a single dollar on barracks; instead, hoard cash, maximize your workforce, and gamble on market spikes to hyper-jump into end-game tech.
Hard Thresholds:
Opening (0-3 Mins): Drop 3 Wheat Farms and 3 Farmhouses to instantly cap your initial 20/20 civilian workforce.
The Tech Jump: Save up $5,000 to fast-buy a Windmill. Use your Construction Workshop builders to instantly complete it—never hard-wait the 3-minute cooldown.
The Economy Baseline: Achieve at least $10,000/minute before expanding into secondary resource plots.
When to Deploy: Best on massive maps where your starting plot is isolated from aggressive players, giving you a safe 4-minute macro window.
The Lingo: Completely bypass ground-based clutter and defensive walls. Beeline straight for aviation tech to bomb the enemy's base before they can deploy anti-air static defenses.
Hard Thresholds:
The Tightrope Build: Skip intermediate money-makers like Carrot Farms or Coal Fabs. Pump 100% of early crop profits into buying the Air Base.
The Power Spike: The exact second your first Apache Helicopter or Fighter Jet spawns, execute an all-out assault.
The Target: Lock onto the opponent's primary housing (Apartments/Skyscrapers). Wipe out their civilian pool, and their high-tier Uranium or Antimatter lines will instantly freeze due to zero worker allocation.
When to Deploy: When scouting a greedy macro player who is banking money for premium crates without building early Watchtowers.
The Lingo: The ultimate "try-hard" killer. Use highly cost-effective static defense grid setups to absorb early pressure, starving the attacker of momentum until they bleed out resources.
Hard Thresholds:
The Grid Setup: Place 2 Watchtowers or 1 Sniper Tower right at the edge of your choke point border.
Anti-Air Buffer: Keep an emergency cache of $15,000 or 500 Gems to fast-buy a Missile Launcher or Rocket Bunker the moment an Air Rush icon appears on the minimap.
The Counter-Swing: Let your towers melt their expensive Mechs or Special Forces. The moment their army tracker reads 0/20, push your troops out to claim adjacent neutral zones.
When to Deploy: Mandatory when your starting plot directly neighbors a highly aggressive sweat or a P2W player rolling high-tier premium crates early.
The Lingo: Mass-produce low-tier, high-replenishment infantry to continuously stomp neutral NPC countries (France, Argentina, Greece) to stack massive passive boosts.
Hard Thresholds:
The Multiplier Stack: Every neutral base captured grants a permanent +5 Civilian limit and a 5% Global Money Multiplier. Securing 3 bases early effectively doubles your eco scaling.
The Garrison Loop: Move your main military rally point directly onto the captured base's flag. Your unit reinforcement speed must out-pace the NPC respawn timer, or you will get stuck in a costly war of attrition.
When to Deploy: Optimal on maps featuring tightly clustered NPC camps and laboratories positioned right between player spawn zones.
The Lingo: The definitive closing playstyle after securing a mid-game lead. Wipe the entire server using maximum tier radioactive infrastructure and continuous god-tier unit spam.
Hard Thresholds:
Industrial Facelift: Delete all basic farms. Replace them entirely with Antimatter Reactors, Area 51 Labs, and Black Hole Generators.
Population Boom: Spam Giant Skyscrapers and Helix Towers to scale your civilian workforce past 200+ units.
The Win-Con: Bank over $1 Billion in liquid cash to max out the Research Tree (Army Size Max, Elite Training +25% Damage). Deploy automated Mech squads backed by active Nuclear Missile Silos for map-wide wipeouts.
When to Deploy: The standard transition for long-duration matches where no single player managed an early-game knockout.
60-Second Scouting & Counter Lookup
What You Spy in Their Base
Detected Strategy
Your Best Counter
Tactical Execution
Zero barracks built; multiple Farmhouses going up.
Launch a synchronized Nuke to delete their defenses, then clean up with Apaches.
Transition Logic: Dynamic Pivoting
The Macro Shift: Economy → Late Game Scaling
This is your primary win-loop. Once your resource selling cycles hit $100,000+ per drop, stop building low-tier apartments. Start systematically deleting your basic Wheat Farms to clear out grid space for Uranium Caves and Data Centers.
The Emergency Pivot: Aggression → Turtle Defense
If your initial Air Rush or Mech assault hits a brick wall of anti-air towers, stop feeding units! Instantly pivot your Research Tree focus from infantry damage to Fast Workers. Recall your surviving forces to your home border, and drop defensive Sniper Towers to stop the counter-push.
Mastering Global Weather & Environmental Events
1. Riot Weather — High Risk, Insane Returns
The Hazard: The server goes pitch black, helicopters swarm the map, and your factories/mines will randomly catch fire, cutting resource output by 50%.
The Play: Don't panic and burn cash over-managing your base. Take your current army control group and send them directly to the nearest Riot Outpost that spawns. Clearing the 9 unique Riot NPCs guarantees a Riot Case Drop, which has a 5% drop rate for secret-tier structures.
The Market Hustle: Take advantage of the global 20% to 30% Market Price Boost active during the event. Dump all your hoarded Data Cubes or Stable Uranium to the Tradesman instantly for peak profit margins.
2. Nuclear Fallout — The Radiation Economy
The Mechanic: A radioactive green fog blankets the map for 13 minutes.
The Strategic Move: Watch your factory nodes closely. If any of your high-value production lines (like Antimatter or Emerald Mines) display the +50% Production Boost green text, immediately re-allocate your civilians to those specific spots.
Zombie Guard: Radioactive fallout triggers wandering Zombies that ignore map aggro ranges and march directly for your home base. Keep a squad of Special Forces on your border lines to protect your civilian workers from being wiped out.
What is the most foolproof strategy for solo queuing in public servers?
Hands down, Territory Control. Most public players do not aggressively capture neutral NPC states early on. This allows you to easily horde all the Global Money Multipliers unpunished, giving you a massive late-game advantage.
How do I know if my aggressive map opening has failed?
Check your unit supply count. If your active army tracking is stuck at 0/20 for more than 45 seconds while attacking an enemy plot, your push has completely stalled. The enemy's defense grid is out-repairing or out-spawning your DPS. Cut your losses, cease production, and pivot straight into a Turtle defense stance.
Can Gamepass automation (Auto-Collect / Auto-Sell) break these strategic setups?
No. Automation only increases your execution speed. It won't fix a terrible base layout or prevent an incorrect matchup choice. A lazy player using Auto-Sell with poor zoning will still easily lose to a manual player running a flawless Air Rush counter-build.